How To Use Tissue Paper In A Gift Bag? Tips
Many people are choosing gift bags over the traditional and more time-consuming wrapping paper alternative. The gift bag is a quick and easy method for “wrapping” your gift. Many people are unsure of how to use tissue paper though.
But how do those boutiques and upscale department stores make their gift bags look so perfect when everyone knows it goes in the bag? You can learn how to use tissue paper in a gift bag by reading this article.
Things To Avoid When Preparing A Gift Bag
Knowing how to put tissue paper in a gift bag is only half the battle; there are a few mistakes to avoid to prevent a quick and easy disaster from occurring during your quick and easy wrapping project. Be sure you don’t fall into any of these gift wrapping traps:
- Using wrinkled tissue paper
- Using too little or too much tissue paper
- Using a bag that’s the wrong size
- Forgetting to remove the price tag on the bag
Choose The Right Gift Bag
First, picking the appropriate bag is crucial. Two to three times as big as your gift, your bag should be. Make sure you have a strong bag with a reinforced bottom that won’t break during transit or as you hand the gift bag over if you’re giving something that’s particularly heavy.
You can choose any style and print of bag you desire. Fun and festive, vibrant and colorful, traditional and tidy. There are a ton of choices.
How To Wrap A Beautiful Gift Using Tissue Paper?
Fold Open The Tissue Paper
It will depend on a few different factors how many tissue papers you require. Naturally, the amount you should use for that accent pop at the top will depend on the size of the bag. However, you’ll also need tissue to wrap any fragile gifts for added protection and to cushion the bottom of the bag. Here’s a general rule for how many pieces of tissue you’ll probably need per gift, though it can vary from gift bag to gift bag.
- Very large bags might use 3 to 4 pieces of tissue for cushioning on the bottom and sides, plus 3 to 4 pieces to poof out the top. To wrap a delicate or fragile gift, extra sheets may be used.
- Medium bags might use 2 to 3 pieces of tissue for cushioning on the bottom and sides, plus 2 pieces to poof out the top. A fragile or delicate gift can be wrapped using additional sheets.
- Small bags might use 1 to 2 pieces of tissue for cushioning on the bottom and sides, plus 1/2 to 1 piece to poof out the top. To wrap a delicate or fragile gift, extra sheets may be used.
Line The Insides Of The Gift Bag With Tissue Paper
Before placing the gift inside, line or crumple tissue along the bottom of the bag. In addition to providing additional security, this will assist in keeping the gift in place.

Place The Gift Inside The Bag
It depends on the gift whether or not you want to wrap it in tissue before placing it in the bag. In either case, once the gift is prepared, put it in the center of the bag and, if there is extra room, add crumpled tissue on either side to prevent too much from sliding around.
Shape The Tissue Paper Over The Gift
When you know how to put tissue in a gift bag properly, getting that polished, professionally-poofed look at the top is actually very easy.
One tissue paper sheet should be laid flat on a table, its center pinched, and then it should be twisted into a point, leaving the top of the paper uncut. So that the unruffled portion is at the top and sticking out of the bag, simply drop the pointed end into it.
Repeat this process with as many sheets as necessary to fill the top of the bag with decorative tissue that has been poofed.
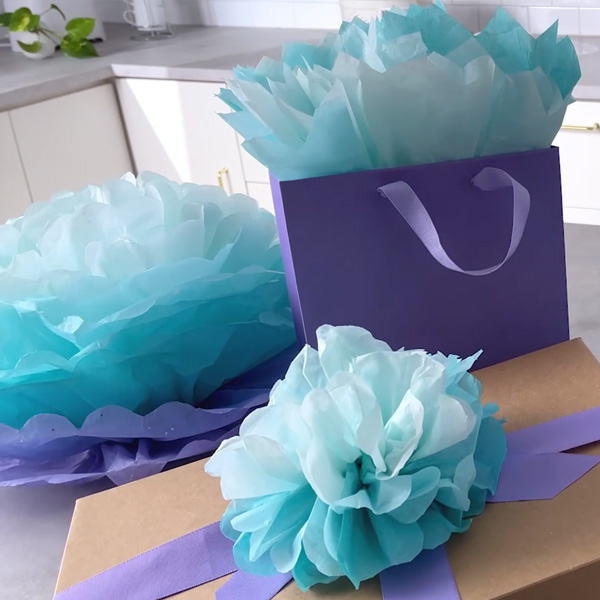
Finish The Gift Bag With Embellishments
Once you’re satisfied with the way the tissue looks, you can add a bow, a thick ribbon, a gift tag, or anything else you can find to the bag to give your gift a little extra flair.
How To Use The Fan Method?
- Put some tissue paper down on a flat surface. Pick a colored item if possible that contrasts with the color of the gift bag. If you want, you can even pick two or three hues that go well with the color and pattern of the gift bag.
- Grab the tissue paper on the sides and bring them together. Depending on the size of the gift bag and the desired length of the tissue paper sticking out, you can either grasp horizontally or vertically. In this instance, a sizable gift bag is being used, so the long sides are being grasped.
- To hold the paper in your non-dominant hand, gather the edges of the paper together in the middle.
- With your other hand, gently tug on the paper’s edges as you hold the gathered paper in one hand. Your tissue paper will start to develop cute little creases as a result of doing this. The easier it is to create creases, the more expensive the tissue paper is. Hint: If you are using less expensive tissue paper, you might want to use your fingers to help form the creases, as seen in the picture with the yellow paper here.
- The tissue paper should now resemble a fan on both sides, and you should still be holding it after working the creases.
- To create a larger fan, fold the sides together until they touch. Alternately, you can fold them so that one fan is in front of the other and slightly lower.
- The more pieces of paper you use, the better. Repeat the aforementioned steps with them. The usual minimum is three to five sheets. Put the completed sheet into the gift bag as you are creating it.
How To Use The Wrist Flick Method?
- Grab the center of the tissue paper.
- Swipe your wrist and arm in a circular motion. The paper in this image is a wee bit old; the newer the paper, the better it will “poof up” when flicked. However, as you’ll see in a moment, this older saved tissue paper still makes a lovely gift bag.
- With your other hand, smooth the whipped piece of paper downward.
- Once you turn it upward, the gift bag should be ready to receive it. If you think it’s necessary, you can give the paper’s edges a little tug to adjust how it looks, but avoid making too many changes or the paper will start to look worn and old.
- With four or five pieces of paper that match in color, repeat the previous steps. Put each of them inside the bag. It only took a few seconds to create a stunning final result, and there it is.
Read More: How to Put Tissue Paper in a Gift Bag?